How To Clean Ice Maker: Maintenance Tips to Keep Ice Crystal Clear

Most people don’t think twice about the ice in their drinks until something tastes off. Maybe the cubes look cloudy, smell strange, or just don’t seem as fresh as they used to. That’s when the question suddenly matters: How To clean ice maker quickly and correctly?

Cleaning your ice maker isn’t just about looks; it’s about keeping your drinks safe, your machine running smoothly, and your ice tasting crisp. In this post, we’ll walk through the simple steps you need to bring your ice maker back to its best, without stress or complicated tools.

Why Cleaning Your Ice Maker Matters

How To Clean Ice Maker

When was the last time you cleaned your ice maker? Most people assume ice is always clean because it’s frozen, but that’s far from the truth. Without proper care, your machine can become a breeding ground for bacteria, mold, and mineral buildup. Understanding why cleaning your ice maker matters not only protects your health, but also helps your machine last longer and produce better-tasting ice.

Why Cleaning Your Ice Maker Matters (Explained in Detail)

1. It Prevents Bacterial and Mold Growth

Moist, enclosed spaces—like the inside of an ice maker—are perfect environments for bacteria, mold, and slime to develop.

  • Dirty ice can contaminate your drinks.

  • Mold spores can spread throughout your kitchen.

  • Some bacteria found in neglected ice makers can lead to stomach issues or infections.

2. It Ensures Your Ice Tastes Fresh and Clean

A dirty ice maker doesn’t just look bad—it affects how your ice tastes.

  • Mineral deposits and old residue can cause ice to smell or taste unpleasant.

  • Odors from leftover water or algae can transfer into your ice cubes.

  • Clean machines produce clear, refreshing ice every time.

3. It Improves the Machine’s Efficiency

Dirt, scale, and mineral buildup force the machine to work harder.

  • Your ice maker may take longer to freeze water.

  • The machine may produce smaller, cloudy, or misshapen cubes.

  • Regular cleaning keeps it running at peak efficiency.

4. It Extends the Lifespan of Your Ice Maker

Just like any appliance, routine maintenance prevents breakdowns.

  • Removing scale buildup protects the internal components.

  • A clean machine experiences fewer mechanical issues.

  • You spend less on repairs or replacements over time.

5. It Helps Maintain Proper Ice Production Levels

A dirty ice maker often can’t keep up with demand.

  • Clogged water lines and sensors reduce the amount of ice produced.

  • You may notice the machine slowing down or stopping entirely.

  • Cleaning your ice maker keeps ice production fast and consistent.

6. It Saves You Money in the Long Run

Regular cleaning avoids unnecessary expenses.

  • You avoid costly repairs caused by clogged internal parts.

  • You won’t need to replace expensive components early.

  • A well-maintained machine consumes less energy and water.

Cleaning your ice maker might seem like a small task, but its impact is huge. From protecting your health to improving efficiency and saving money, the benefits are clear. A clean ice maker ensures you always get pure, great-tasting ice while extending the life of your machine. With just a little regular maintenance, you can keep your ice maker running smoothly and reliably for years.

Understanding Your Ice Maker Type

Not all ice makers are built the same. Understanding the type of ice maker you own is crucial before cleaning or performing maintenance. Different models have unique components, water lines, and cleaning requirements. Knowing your machine type helps you clean it effectively, avoid damage, and maintain its performance over time.

Common Ice Maker Types

1. Built-In or Refrigerator Ice Makers

  • These are integrated into refrigerators and freezers.

  • Water lines run directly into the machine, and ice is often dispensed via a door or tray.

  • Cleaning involves the interior tray, water reservoir, and sometimes the filter.

2. Countertop or Portable Ice Makers

  • Compact units designed for home or office use.

  • Usually have removable trays and water reservoirs.

  • Easier to disassemble, making cleaning straightforward.

3. Commercial Ice Makers

  • Found in restaurants, hotels, or large offices.

  • Produce larger quantities of ice and often have complex internal components.

  • Require more frequent cleaning and may need professional maintenance to prevent bacterial growth or scale buildup.

4. Modular Ice Makers

  • High-capacity machines often used in hotels or hospitals.

  • Ice is produced in cubes or nuggets and stored in separate bins.

  • Cleaning involves both the ice production area and storage bins, often with specific manufacturer-recommended procedures.

Understanding your ice maker type is the first step to effective cleaning and maintenance. Each model has unique features, so knowing what you have ensures you follow the right cleaning method, protect your appliance, and enjoy fresh, safe ice every time. Always refer to your owner’s manual for model-specific instructions.

What You Need Before You Start

Cleaning your ice maker is much easier and more effective when you’re fully prepared. Having the right tools and supplies at hand ensures the process goes smoothly, prevents mistakes, and helps you get the best results. Before you start scrubbing and rinsing, make sure you have everything you need for a thorough and safe cleaning.

Essential Items to Gather

1. Warm Water

Warm water helps dissolve mineral deposits and makes cleaning solutions more effective.

2. Mild Dish Soap or Ice Maker Cleaner

Use gentle dish soap for everyday cleaning, or a specialized ice maker cleaner for tougher buildup.

3. White Vinegar or Lemon Juice

Natural cleaners like vinegar or lemon juice are excellent for removing scale and sanitizing surfaces.

4. Soft Sponge or Microfiber Cloth

These are perfect for wiping down surfaces without scratching the interior or exterior.

5. Soft-Bristle Brush or Toothbrush

Ideal for reaching tight corners, edges, and small crevices where residue can hide.

6. Clean Towels

Use towels to dry all parts thoroughly after cleaning, preventing mold and bacteria growth.

7. Bucket or Large Bowl

Useful for mixing solutions and catching water when draining the machine.

8. Ice Scoop (If Applicable)

Remove and clean the ice scoop separately to ensure no contamination.

9. Owner’s Manual

Refer to your manual for guidance on removable parts, safe cleaning methods, and proper reassembly.

10. Protective Gloves (Optional)

Gloves protect your hands from chemicals and cold surfaces while keeping the cleaning process hygienic.

Being prepared before you start cleaning your ice maker makes the entire process faster, safer, and more effective. With the right tools and supplies on hand, you can remove buildup, sanitize your machine, and enjoy fresh, clean ice every time. Taking a few minutes to gather these essentials ensures your ice maker stays in top condition for years to come.

Step-by-Step: How To Clean an Ice Maker (Universal Method)

How To Clean Ice Maker

Cleaning your ice maker regularly is essential for hygiene, ice quality, and appliance longevity. Even if your ice maker seems clean, hidden mold, bacteria, and mineral buildup can affect your ice. The following universal method works for most countertop and built-in ice makers, ensuring your ice stays fresh and your machine runs efficiently.

Step 1: Turn Off and Unplug the Machine

Before starting, always turn off your ice maker and unplug it from the power source. This ensures safety while cleaning and prevents any accidental operation during the process.

Step 2: Remove Ice and Water

  • Empty the ice bin completely.

  • Drain any remaining water from the reservoir or machine tray.

  • Dispose of old ice to avoid contamination.

Step 3: Disassemble Removable Parts

  • Take out the ice tray, ice scoop, and any removable filters or water lines.

  • Check the owner’s manual for guidance if you’re unsure which parts are detachable.

  • Place removable parts in a safe spot for cleaning.

Step 4: Prepare Cleaning Solution

  • For a gentle clean: mix warm water with mild dish soap.

  • For a deep clean: mix equal parts white vinegar and warm water, or use a commercial ice maker cleaner.

  • Make enough solution to submerge small parts or wipe down interior surfaces.

Step 5: Clean Removable Parts

  • Soak trays, scoops, and filters in the cleaning solution for 10–15 minutes.

  • Use a soft sponge or brush to scrub away mineral deposits, slime, or residue.

  • Rinse thoroughly with clean water to remove all soap or cleaner residue.

Step 6: Clean the Interior

  • Dip a sponge or cloth in the cleaning solution and wipe the interior surfaces of the ice maker.

  • Use a soft-bristle brush or toothbrush for tight corners, edges, and around the water inlet.

  • Avoid abrasive materials that could scratch the machine.

Step 7: Rinse and Dry

  • Wipe down all interior surfaces with a clean, damp cloth to remove remaining cleaning solution.

  • Dry thoroughly with a clean towel or allow the parts to air dry to prevent mold or bacterial growth.

Step 8: Reassemble the Machine

  • Once all parts are dry, reassemble the ice maker carefully.

  • Replace any filters, trays, or scoops exactly as they were before.

  • Ensure everything fits snugly to avoid leaks or malfunction.

Step 9: Run a Test Cycle

  • Plug in the ice maker and turn it on.

  • Run a small cycle of ice production and discard the first batch of ice.

  • This ensures any remaining cleaning solution or debris is flushed out.

Regular cleaning of your ice maker prevents bacterial growth, improves ice taste, and keeps your machine operating efficiently. By following this universal method, you can maintain fresh, clean ice while extending the lifespan of your appliance. A little routine care goes a long way in ensuring your ice maker stays safe and reliable.

How to Clean Specific Ice Maker Types

While the universal cleaning method works for most machines, some ice makers require specialized steps due to their design, size, or complexity. Cleaning your ice maker according to its type ensures better results, prevents damage, and keeps your ice safe and fresh. Below is a step-by-step guide for cleaning the most common ice maker types.

1. Built-In or Refrigerator Ice Makers

  • Turn Off and Unplug: Safety first—always disconnect the power.

  • Remove Ice and Tray: Empty the ice bin and remove the tray if possible.

  • Clean Water Lines and Reservoir: Use a mixture of warm water and vinegar or a commercial ice maker cleaner to flush water lines.

  • Wipe Interior Surfaces: Use a soft sponge or cloth to clean the ice compartment, paying attention to corners.

  • Rinse Thoroughly: Run several cycles of plain water to remove cleaning solution.

  • Reassemble and Test: Put everything back and discard the first batch of ice to ensure no residue remains.

2. Countertop or Portable Ice Makers

  • Disassemble Removable Parts: Remove trays, scoops, and the water reservoir.

  • Soak and Scrub: Wash parts in warm soapy water or a vinegar solution; use a soft brush for crevices.

  • Clean Interior: Wipe the machine’s interior and ensure no water or residue remains.

  • Rinse and Dry: Rinse with clean water and dry all parts thoroughly before reassembly.

  • Run a Test Cycle: Make a small batch of ice and discard it to ensure cleanliness.

3. Commercial Ice Makers

  • Refer to Manufacturer Instructions: Due to complexity, always check the manual.

  • Turn Off and Drain: Disconnect power and remove ice and water from the machine.

  • Disassemble Components: Take out trays, bins, and filters where possible.

  • Deep Clean: Use a commercial ice maker cleaner or approved sanitizing solution to scrub all components.

  • Sanitize Water Lines: Flush water lines according to manufacturer recommendations.

  • Rinse and Reassemble: Rinse thoroughly, reassemble, and run a test batch.

4. Modular Ice Makers

  • Empty Storage Bins: Remove all ice and separate storage bins.

  • Clean Ice Production Area: Wipe down the ice-making compartment with warm water and cleaner.

  • Sanitize Bins: Clean bins separately using mild soap or sanitizer solution.

  • Check Manufacturer Guidelines: Many modular units require specific cleaning cycles or chemicals.

  • Rinse and Restart: Rinse thoroughly, reassemble, and discard the first batch of ice.

Cleaning ice makers according to their specific type ensures maximum efficiency, better-tasting ice, and a longer appliance lifespan. While universal methods work for general maintenance, following type-specific steps protects delicate components and prevents contamination. Always consult your manual for model-specific instructions and maintain a regular cleaning schedule for the best results.

Cleaning and maintaining your ice maker is essential, but doing it incorrectly can damage the machine or even pose safety risks. Following simple safety precautions protects both you and your appliance while ensuring your ice stays clean and fresh.

Key Safety Tips

1. Always Unplug the Machine

Before cleaning, always turn off and unplug your ice maker. This prevents electric shock and stops the machine from accidentally turning on during cleaning.

2. Avoid Harsh Chemicals

  • Do not use bleach, ammonia, or abrasive cleaners unless recommended by the manufacturer.

  • Harsh chemicals can corrode internal components and leave harmful residues on your ice.

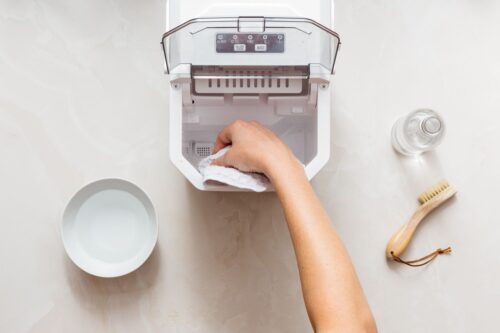
3. Use Soft Cloths and Brushes

  • Avoid steel wool or hard brushes that can scratch surfaces.

  • Scratches can harbor bacteria and reduce the lifespan of your machine.

4. Do Not Immerse Electrical Parts

  • Never submerge the ice maker’s electrical components, motor, or plug in water.

  • Only removable trays, scoops, or bins should be soaked for cleaning.

5. Follow Manufacturer Instructions

  • Every ice maker model is different. Check the owner’s manual for recommended cleaning solutions, methods, and parts removal instructions.

  • Following the manual prevents accidental damage to sensors, water lines, or filters.

6. Handle Water Lines Carefully

  • Be gentle with water inlet tubes and lines to avoid cracks or leaks.

  • Use only recommended cleaning solutions to flush water lines.

7. Dry Thoroughly Before Reassembly

  • Moisture left on electrical parts or inside compartments can cause mold or short circuits.

  • Always dry all components completely before putting them back together.

By following these safety tips, you can clean and maintain your ice maker without causing damage or risking injury. Careful handling, the right cleaning solutions, and proper attention to the machine’s electrical and mechanical parts ensure your ice maker stays in top condition and produces safe, fresh ice for years to come.

Maintenance Tips to Keep Your Ice Maker Clean Longer

How To Clean Ice Maker

Cleaning your ice maker is essential, but regular maintenance can prevent buildup and reduce the frequency of deep cleaning. With a few simple habits, you can keep your machine running efficiently, produce fresh-tasting ice, and extend its lifespan.

Top Maintenance Tips

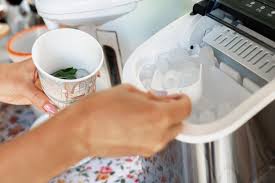
1. Regularly Empty and Rinse the Ice Bin

  • Remove ice at least once a week and rinse the bin with warm water.

  • Discard old ice to prevent bacterial growth or unpleasant odors.

2. Wipe Down Surfaces Weekly

  • Use a soft cloth or sponge to wipe the interior and exterior surfaces.

  • Pay attention to corners, lids, and water trays where residue can accumulate.

3. Replace Filters as Recommended

  • If your ice maker has a water filter, follow the manufacturer’s replacement schedule.

  • A clean filter prevents scale, sediment, and bad odors from affecting your ice.

4. Use Clean Water Only

  • Always fill the reservoir with fresh, filtered water.

  • Avoid using softened or hard water without proper filtration, as minerals can cause buildup.

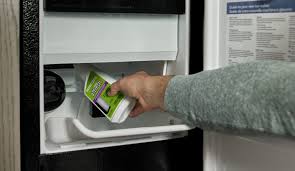
5. Run Cleaning Cycles Periodically

  • Many modern ice makers have self-cleaning cycles—run them monthly if available.

  • For machines without automatic cycles, a vinegar or mild soap rinse every 1–3 months helps maintain cleanliness.

6. Keep the Machine Dry When Not in Use

  • If you won’t be using the ice maker for several days, drain water and dry all parts.

  • This prevents mold growth and eliminates stagnant water issues.

7. Check for Leaks or Damage

  • Inspect water lines, trays, and electrical connections regularly.

  • Early detection of leaks or cracks prevents bigger problems and maintains efficiency.

Routine maintenance is the key to keeping your ice maker clean, efficient, and safe. By following these simple tips like emptying old ice, wiping surfaces, replacing filters, and using clean water you can minimize buildup, reduce deep-cleaning frequency, and enjoy fresh, high-quality ice every day. A little ongoing care goes a long way in preserving both your machine and your ice.

Conclusion

Knowing how to clean ice maker is more than just a maintenance taskit’s a step toward healthier, clearer ice and a longer-lasting appliance. By regularly cleaning your ice maker, you prevent mold, mineral buildup, and unpleasant odors, ensuring every cube of ice is fresh and safe for use. The process may seem tedious at first, but the payoff is worth it: sparkling ice, smoother operation, and fewer costly repairs down the line.

Remember, a clean ice maker isn’t just about functionalityit’s about enhancing your everyday comfort and protecting your family’s health. Start implementing these cleaning routines today, and watch your ice maker perform like new, serving perfectly chilled drinks every time.